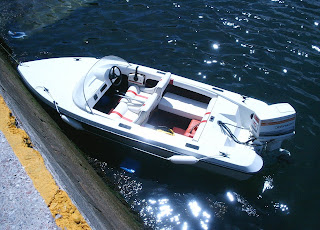
All sorted again now. This was a really weird day, because everything seemed to go to plan. Literally everything!
First job was to repair the transom. After grinding out the corner, the crack was only surface deep for the most part (a bit deeper near the top), so it was just a case of some fibreglass matting in the corner, followed by fibreglass paste, which was smoothed and followed by paint. The area cracked was actually the joint between the marine ply we bonded in a month or so ago, and the actual boat. Nothing had been damaged other than the joint. Quite lucky really!
We then decided to check the gearbox oil. Checking this prior to my holiday revealed it was half full with water, most probably from a leak somewhere. However, no water was present this time, so a nice job escaped there!
Finally, we wanted to look at the engine water coolant system. Whilst on holiday the amount of water squirting from the engine had really slowed, to pretty much a drip on the engine idle. Obviously the first check would be to clear the inside of the nozzle and pipe. Dad wiggled some thick wire inside both of them, and then we connected it back up. It worked fantastic. More powerful than I'd ever seen it! What a difference a bit of salt water makes!
Next on the agenda is a new ski pole (probably home made, have you seen the price of these?!?), and some vinyl graphics for the rear of the sides of the boat. Also on the agenda is more usage of the boat as soon as some decent weather comes back!
Sunday, 2 August 2009
Sunday, 19 July 2009
I hate being home, I hate work, I want to be on holiday again, leave me alone
I've just got back from my holidays - time to go back to work, hooray...
Due to quite dodgy weather I only got to use the boat on two days of my ten day trip, but I had rather a lot of fun on those days!
The first day me and Dad simply took it out for a spin. Seemed quite fast. I always knew it would be, but you can't beat the feeling of actually experiencing it. We later picked Sarah my ladyfriend up from the shore and took her for a ride.
The second time we went out I had a play with my towable ring, which was also rather fun.
However, I've also come back with quite a long list of 'ammendments' which need making. Or rather I've broke it quite a bit and it needs fixing.
Firstly I need a new cover. My two month old one decided to rip in half on the M5 due to the wind forcing it onto the boat seats. Obviouisly made well.
Secondly, and this is the big one...When I was playing in my towable ring, upon falling off, the ring filled with water, and the drag created by this snapped(!) the thick metal ski pole in half. Which then cannonned into the back of the boat. Which then cracked along the transom which we had re-built all of a month ago. Fantastic... First impressions are that it's only a surface crack, so hopefully too much work won't be needed.
Finally, I have a feeling that the impeller will need replacing on the engine pretty soon, as the water pump doesn't seem to be shooting out the water as quickly as it did previously. But I suppose this is more maintenence than a problem.
Tuesday, 7 July 2009
We're all going on a summer holiday
It's holiday time, and the boat's ready to go. Wahoo!
No time for any pictures (will get some on holiday), but here is a brief rundown of what we've got done in this last week.
We've ammended the rollers on the back of the trailer. They seemed to sit in the most awkward place on the bottom of the boat, so we've grinding some bits and moved some bits to make them sit all nice.
When sorting the boat insurance a name was needed. I had to make a decision there and then. Well, maybe not right there and then, I had a think overnight. But in the end, and after some careful browing of various boat name websites, I went for the slightly comical "Wake My Day". Later in the week I purchased some vinyl stickers of the name for the sides of the boat.
I also grabbed a couple of fenders for the side of the boat from the local Sawley Marina.
One slightly worrying sight was when we decided to check the gearbox oil - loads of water poured out from where the oil should be! I think this must have mounted up throughout the years, as it smelt quite bad like it had been in there for ages. Probably from a small leak. Fortunately, oil floats above water, so it was easy enough to drain only the water. We've now topped up the oil and will have a look for any water when I get back from holidays.
See you when I get back from holiday!
Monday, 29 June 2009
The final stetch, the home straight, etc...
Wow, progress is really coming along now. Holiday in a couple of weeks. Roy seems to have become a permanent fixture in the boat weekends now, which speeds things up a bit.
The radio has finally been installed. Still only one speaker, and it will remain that way until I get back off holiday. As long as I'm not too fond of anything in the left channel of a stereo mix I'll be fine.
The bilge pump has been re-fitted. It is designed to be fixed into the floor, but we didn't fancy doing that, as essentially we would be making holes in the bottom of the boat. In the end, we did pretty much the same as was done originally - a piece of wood attached to the lower transom holding the bilge pump down.
Everything has been rewired by Dad. I'm not even going to try and explain the details of this, because I haven't got a clue.
The rear panel has been re-fitted. This had to be cut to accomodate the rear seats. As I may have said before, it looks as though this and the front seats have been taken from another boat. This back piece was designed to be part of a rear bench seat, rather that two side seats, hence the reason for the cutting.
Speaking of seats, the front ones have also now been installed. Again. They've been put on wooden frame similar to before. Just with better wood that won't rot.
Another neat new addition is the engine kill switch/cord. Dad has fitted it into the engine control box. All I have to do is wear the cord around my ankle, and if I fall out of the boat or something, the engine stops. Fantastic.
We also finally got the chance to try the engine in water. Roy asked a neighbour if we could have a large water tank that has been sitting on his front garden for a while. He said yes!
We came to start the engine and...it started. Straight away! The only problem was that the alternator didn't seem to be charging the battery. But Dad thinks he may have found the solution to that since.
Highlight of the day was probably Dad accelerating the engine and filling the garage with water from the tank.
One more weekend until holiday. Should finish just in time!
Monday, 22 June 2009
Transom-mer holiday
Transom's all been stregnthed now. Or in a language I understand, the back end is stronger.
Roy came around to help me and Dad, but basically the process was:
Sand the front of the transom.
Fibreglass a piece of marine ply to it.
Do the same for the inside-the-boat section of the transom.
Fibreglass some matting over the top of those.
And then some fibreglass paste on the top piece.
Sand it for a nice finish.
Sand it again.
And again.
Stick a new aluminuim plate on the back.
Get Dad to heat up some plastic tubes and bend the ends making them 'drainage tubes' (sometimes I think he has way too much time on his hands).
Add the metal right-angle piece along the top.
Spray the lot.
Bolt the engine back on (which wasn't half as hard as taking it off).
Job's a good'n.
A new set of steering cables have also been installed. Before the were connected directly to the engine without going through any kind of springs to tension them. Now the do go through the spring, which has basically doubled the ratio of steering wheel movement to engine movement. Should be easier to steer now.
Rumurs have been circulating this week that Dad may respray the boat sometime next year. I'm thinking either red or black. Hmm...
Thursday, 11 June 2009
Interior design
All the inner panels have now been re-made, covered and installed.
For the two side panels, we decided to use the sponge pieces from the previous panels, and the dash has just been covered straight with the fabric.
Looking at the pictures of the old panels, I think it now looks much better.
Also, I managed to save a bit of money on the fabric - rather than buying three metres to do the side pieces, I bought two, and got a free 'sample' strip of some red fabric. A nice red join in the middle looks nice, and means that I can join two strips of white fabric. Fantastic.
Coming along nicely now. The only major thing left is strengthening the transom.
Holiday in a few weeks, hope it's done in time...
Sunday, 31 May 2009
...And back on again!
The trailer is now complete. Hooray! Much work was needed, but we've finally got it done. Firstly, the original winch post was so badly damaged that a complete new one has been welded up by Dad. Then all the rollers were replaced, and a frame was welded below the rear roller as it was too low down for the boat.
New mudguards were purchased and new frame welded for those. The whole trailer has been rust treated and painted.
The side rollers have been given a bit of a makeover.
And finally, two new Mini wheels have been bought. I only wanted one as a spare, but the two were in such good condition we bought the pair.
Sunday, 17 May 2009
Off the trailer
It was slightly wet. Very windy. But this weekend, we finally removed the boat from the trailer. It took a good few hours, but at the same time it was quite simple.
We made some wooden frames to sit under the boat at both the front and back. We then jacked the boat up a few inches higher than the trailer, starting with the back, and placed it onto breeze blocks. The trailer then simply wheeled out from underneath.
It took a few trials and errors (such as the mudflaps having to be cut off as they wouldn't fit underneath), but it now looks fairly stable. Probably more so than when it was on the rusty trailer!
Now the trailer is free we have taken it back to my Dads, and work can now begin making it more useable. I have a full set of brand new rollers for the main middle section, and Dad is making new brackets to hold the existing rollers on the sides. He has also made a new winch post for the front - initial plans were to repair the existing one, but it was so badly rusted it made more sense to make a new one.
Hopefully in a couple of weeks these should all be attached to the trailer, and the whole thing will have been rust treated and painted.
That's the plan anyway.
Friday, 8 May 2009
The name saga continues...
I have more info on the boat name and make. After chatting with people on the cmba.co.uk forum, and from checking out various boats on eBay, I have found out that my boat is either a Fletcher V139 or a V149. The V139 is just under 14ft, so I’m thinking it’ll be a V149, but it’s just a case of measuring it up and confirming, which won’t be for another week as I’m off to Skegness tomorrow!
They even supplied a picture of the V139 from the original brochure. It’s apparently from the late 60s! Unbelievable. It’s in fantastic condition considering. Just think, when this boat was made nobody had yet landed on the moon, and England were current football world champions…
Thursday, 7 May 2009
Take a seat
After a rainy April, hopefully more work should be done on the boat this month. The main progress over the last couple of weeks has been the rear seats. One is now completely finished, and the other isn’t too far off. Dad made the wooden bases, I varnished them, and Mum made the cushions. A real family effort!
The wooden bases have a hardwood frame underneath them, which is designed to slot into the side storage compartments on the boat to hold the seats in place. In the past it looks as though hinges were used, but I imagined it would be a little awkward opening and closing the seats to reach the storage, so we went for the lifting on and off idea instead.
The wooden bases then have a 2” piece of foam on top, and are covered in white fake leather, chosen to match the front seats. However to get a proper colour match I’m going to have to really give the front seats a good clean. Or maybe dirty the rear seats up (would certainly be easier).
Last weekend the side panels were taken off the boat (with great difficulty, due to the rusted in bolts – again, a job for Dad). These will now be re-made and covered in the same fake-leather material as the seats. I think the sponge from the old side panels is still useable, so I’ll give that a clean up and remove all the embedded bolt rust.
Apart from the dashboard, the boat is now completely stripped inside, with only just over a month to get it ready for holidays. Arrrrgh!!!
Sunday, 19 April 2009
A new lick of paint
This weekend was about getting the trim/tilt system all up and running again. The actual problem had been cured a couple of weeks ago, now it was a case of putting it back together again.
A sheered off bolt (from the previous owners) had to be extracted. My Dad and his good friend sorted this out last week, with the use of some very hard drills. This weekend, the hole was re-threaded and a new bolt was used.
We also took some time out to give the whole trim/tilt system a bit of a paint.
With a little bit of wiggling, the steering wheel eventually came off, as did the radio. These will both now be replaced with new items (just bought a radio off my mate for £30). The marine radio and antenna were also removed, and will now be sold to make funds for the rest of the boat!
Saturday, 28 March 2009
Engine removal - Finding out I'm not quite as 'man' as I previously thought!
It was finally time to do the big job that we had been putting off until we got some nice weather. Strange that we chose to do it on a rainy day then, but at least I had a 37% effective cover to keep putting on the boat during the spells of downpour.
We collected the boat from my Nanna's drive in the morning, and towed it back to my Dad's drive and garage. We thought this would be a good opportunity to finally see the engine running and pumping water, so we connected the hose up to it, connected the battery, turned the key, and...Nothing. I figured the best way to approach this would be to go and make a pot of tea, and let Dad have a look for the problem! Eventually he found a frayed wire going into the solenoid, and upon replacing this, the engine started.
However, it seemed to run extremely lumpy, and coughed and spluttered quite a lot. This wasn't how it ran a few weeks ago! After making another pot of tea, Dad discovered a bad connection into one of the spark plugs - the engine had been misfiring. All this really needed was a trim at the end and a bit of a clean up.
We then broke some kind of seal/o-ring on the hydraulic cylinder using for titling the engine (turning a screw in it allows the fluid to flow so the engine can be moved by hand). This then proceeded to leak hydraulic fluid all over us. It looked nice though, sort of like red wine.
The prop was then removed as it had began making a slightly uneasy noise as it span. This turned out to be grainy grease and dirt around the rim of the prop. Probably due to the fact that it is also the engine's exhaust. We cleaned it up, but I'm guessing it's just going to get the same again until it's had some decent usage and a good blast out.
Right, 2 hours work done, and the boat was at the stage I assumed it was at when I picked it up in the morning, minus one gasket and some hydraulic fluid. Time for lunch!
Now to remove the engine. As expected, this was bolted on with lovely steel nuts and bolts which, whilst probably all looked nice and shiny a couple of years ago, were now rusted firmly in place. Six of them altogether. However, rather surprisingly, the top 4 weren't too difficult to remove. The bottom two posed more of a problem. Especially as the bolts used were about 6 inches long, and the only thing small enough to get at them with was a pathetic little spanner. Still, with a little gentle persuasion, they came off. Obviously, in keeping with the spirit of the boat, there was a piece of rotted, non-water-resistant wood also held on by these bolts, which came off too.
The engine was now just held on by two brackets at the top, and bonded (with another piece of rotted wood) to the outside of the boat with a white resin stuff.
Dad said that two people could lift his old Mercury 50hp engine. So we figured we could lift this...My god! How this is ridiculously heavy!!!!!!! After 10 minutes of struggling, we managed to lift it off the boat (rotted wood attached), and lay it on the floor. I've got a funny feeling it might be staying there forever!
It didn't take long to sort out the problem with the trim/tilt system - from removing the engine it was now clear that a wire going into the motor was a bit dead. This was fixed, and the trim/tilt mechanism worked fine. Well, as fine as it could with half of it's hydraulic fluid missing. Fantastic.
So all in all we achieved what we had set out to do today, which was remove the engine and fix the trim/tilt. We just had a bit more fun along the way!
One more thing worth mentioning is that, upon removal of the engine, the transom had quite a few cracks along the top. It feels solid enough inside, but it is slightly worrying. Maybe this engine is slightly over sized for this boat? We're currently weighing up our options with this. Is it worth putting some extra work in to further strengthen it? Hmmm...
Sunday, 22 March 2009
Win or rust!
Today I decided to have a go at removing the side panels on the inside of the boat. However, a try it was as they didn't feel like coming off. I'm starting to notice a pattern with everything on this boat - it all seems to be held together with steel bolts which are now rusted firmly in place! Since I didn't have the tools to hand or the Dad with me to assist, I figured this should be a job for another day.
I then had a go at t-cutting the windscreen, trying to remove some of the small scratches on the surface. This didn't go too well either, as it could do with a lot more hard work, and frankly, it was too cold and I wanted to go home.
My least productive day so far? Most probably.
I then had a go at t-cutting the windscreen, trying to remove some of the small scratches on the surface. This didn't go too well either, as it could do with a lot more hard work, and frankly, it was too cold and I wanted to go home.
My least productive day so far? Most probably.
Wednesday, 18 March 2009
Named and shamed
In the neverending quest to find out what boat I have, my Dad has found one exactly the same on Ebay. Not much information is known about this either, but apparently it is a Fletcher.
My knowledge of Fletchers is quite good from the late 70s onwards, so it must be a bit older than that. I must say, she's aged very well.
Saturday, 14 March 2009
Seat removal and carpet clean
It's been a couple of weeks since I'd so much as seen the boat, but with some nice sunny weather, and no bloody dog show to go to like last weekend, today I set about a doing a few tasks.
The main priority is still generally giving the boat a good clean, and today I wanted to set about the carpet. Especially the area in between the two rear seats. As you can see in the below pic, it's quite grubby!
The easiest way to do this was by using a scrubbing bush with hot water and washing up powder, and then blasting it with the pressure washer. At least that was the plan - first the front seats would have to come out to make space...
I'd sort of wanted to remove these seats anyway, as the wood they were mounted on didn't look too healthy. In truth it was a bit of a bodge job. Removing these seats was fairly painless however, just six screws underneath the base cushion holding them onto the wood.
The aim was to get the wood base plates off today as well, but they were so rotted in place I decided to wait a while. I may have to get a saw to them anyway, and creating saw dust when I'm about to get everywhere wet probably wasn't a good idea! So they would have to stay for now...
After this I gave the boat a big clean with the pressure washer. It now looks a lot better.
I've also made the decision this week to go with the two seat seats at the rear, rather than the planned bench seat. The areas that support the seats could be structual, so it's probably not a good idea to remove them to make a seat! Plus they make nice storage compartments for my sandwiches.
I've also given the seats a decent clean with soapy water now they are out. The wood in the seats is rotting in a few places, so it may have to be replaced. Hopefully the clean I've just given them won't speed along the rotting process!
And since I never posted the picture on the last update, here is the boat looking proud without it's crap name.
Saturday, 28 February 2009
A good Spring clean. If Spring means standing in the cold, freezing your b*llocks off, whilst peeling at vinyl letters
Today I spent the day giving the boat a good clean. It's no longer minging to walk or sit in, it's actually quite nice. I've also drained pretty much all of the water from under the floor by standing with the front of the boat held high for about 5 mintues!
I also had the chance to take a few pictures, including a close up of the name before I got rid of it. It took a good half hour to remove it from both sides and the transom, but with good use of a hot air paint-stripper and some thinners, all is gone (obviously I took the pictures before this - my tired hands were in no state to hold a camera afterwards). It looks quite good, and it's quite hard to see where the name ever was.
We've come up with a list of what should be done with the boat:
New rollers for the trailer - The current ones are damaged and mishaped
New cover - Both one for the engine and boat, as at the moment, the cover is slightly too small
New steering wheel - The current one is badly rusted
New rear seats - Rather than simply re-covering the rear seats, it's probably better to make new ones. I'm undecided yet as to whether I want a bench seat or to keep the two rear seats idea
Fix the engine trim/tilt - This is more one for Dad than me, as I have no idea. But yeah, it needs fixing
Weld trailer - A few bits that need re-welding. Again one for Dad
Paint trailer - Including a good amount of rust treatment
New dash/side panels - Rather than recovering the current ones (the wood is a little rotten), it's probably best we make new ones from marine ply. I'm currently in two minds as to whether I would like to cover this or just varnish the wood
Speedometer - Hasn't got one at the minute
New speakers - Being a bit of an audio engineer, the current poor quality, one speaker set up offends me quite a lot
New stereo - This is only a maybe, as I sort of like the radio cassette. It reminds me of my first car, in a retro-tastic kind of way
Sunday, 22 February 2009
My 'adventure' officially starts here
Today I picked the boat up. As my car doesn't yet have a towbar, my Dad drove up to collect the boat. The owners showed us the engine starting, and Dad checked the wheel bearings on the trailer. All seemed fine. I haven't really had chance to take any pictures, but I will do so next week.
Once I got it home I had a look around. It was quite minging inside, and had obviously been standing for quite a while. Lots of leaked petrol and stale water on the carpet. Plus lots of general crap such as empty WD-40 cans and frayed bits of rope. A cleat seemed to be missing from the front of the boat, but that was later located under one of the rear seats. Lots of water under the floor too, but most of that could be drained out by the drainage hole in the back.
Overall, the boat just needs a general clean, and a bit of modernising. I think I will recover/redo the dash and inner side panels at some point, and the rear seats definetely need replacing.
The trailer is also in need of a fair bit of welding and rust treatment, but it seemed to tow back absolutely fine.
My Dad also realised the meaning of the 'funny' name - "Pistol Knight". That would have to go!
It was late in the day at this point, and any cleaning would have to wait for the next weekend. My Nanna has kindly offerred to let me keep the boat on her drive, so it was off to hers to park it there for the week.
Right after I put some gaffa tape on the holes in the cover...
Saturday, 14 February 2009
I've got one!
I've bought a boat! It's one I've been watching on Ebay for a few days, and after getting a bit drunk after one of my band's gigs last night, I came home and made an offer. Only to wake up this morning and realise that, I'd won it! Fantastic. Here are some pictures from the listing.
For sale is this 15ft speed boat with fiberglass hull. It has fitted the extremely powerful 70hp johnson seahorse engine (3 cylinder, 2 stroke) the engine starts and runs fine on all 3 cylinders.It has both forward and reverse gears on front controls with remote electronic power tilt/trim.It also has a recently fitted NASA marine offshore radio with distress function. The boat is also fitted with a cassette radio.Both radios have independent airials. On the front panel of this boat you will find the electronic bilge pump controls with both auto and manual functions.Under the front panel is the fire extinguisher.The fuel tank is a 22 liter portable type filled with fresh fuel and quality marine 2 stroke oil. Also fitted to the boat is a tow poll for use with skis, wake boards, doughnuts etc.The fiberglass hull is in good solid condition, with no obvious major damage or repairs. The trailer that the boat sits on includes, a light board,jockey wheel and working mechanical winch. Please note that this boat has come to us in part exchange against a motorcycle and appears not to have been used for a while, as such it may need a few minor repairs, a general service, and a general check over. In the rear of the boat is a 12v car type battery that will need charging or replacing. The power tilt has worked in the past but need attention (possibly the switch). please note that one trailer mudguard,although functional, may need to be replaced. One tyre has some cracking but does hold air. The trailer itself tows well staying straight and stable. The engine can be seen running by hooking up to a battery with jump leads. It also comes with a long length of water hose, I imagine this is for flushing or cooling the engine whilst out of the water. Please note that the engine has been started by us for a maximum of 20 seconds, then turned off as these engines can not be run for extended periods out of the water. With this boat comes a flourescent prop cover and a very thick and comprehensive operators manual
I'm going to pick it up next Sunday (Forest and Derby play the next Saturday, so I couldn't possibly miss that).
I don't know the make or model of the boat, but for the tidy sum of £1000 I'm fairly pleased with my purchase. Especially as it has a 70hp, 2-stroke Johnson outboard. This should really fly when I get it on the water! It's from a place in Anderton, Cheshire called Soot Hill Motorcycles. I believe somebody used it as a part exchange on a motorbike. Although I'd rather have the boat myself...
It is in need of some work however. Here's the description as it appears on the listing:
For sale is this 15ft speed boat with fiberglass hull. It has fitted the extremely powerful 70hp johnson seahorse engine (3 cylinder, 2 stroke) the engine starts and runs fine on all 3 cylinders.It has both forward and reverse gears on front controls with remote electronic power tilt/trim.It also has a recently fitted NASA marine offshore radio with distress function. The boat is also fitted with a cassette radio.Both radios have independent airials. On the front panel of this boat you will find the electronic bilge pump controls with both auto and manual functions.Under the front panel is the fire extinguisher.The fuel tank is a 22 liter portable type filled with fresh fuel and quality marine 2 stroke oil. Also fitted to the boat is a tow poll for use with skis, wake boards, doughnuts etc.The fiberglass hull is in good solid condition, with no obvious major damage or repairs. The trailer that the boat sits on includes, a light board,jockey wheel and working mechanical winch. Please note that this boat has come to us in part exchange against a motorcycle and appears not to have been used for a while, as such it may need a few minor repairs, a general service, and a general check over. In the rear of the boat is a 12v car type battery that will need charging or replacing. The power tilt has worked in the past but need attention (possibly the switch). please note that one trailer mudguard,although functional, may need to be replaced. One tyre has some cracking but does hold air. The trailer itself tows well staying straight and stable. The engine can be seen running by hooking up to a battery with jump leads. It also comes with a long length of water hose, I imagine this is for flushing or cooling the engine whilst out of the water. Please note that the engine has been started by us for a maximum of 20 seconds, then turned off as these engines can not be run for extended periods out of the water. With this boat comes a flourescent prop cover and a very thick and comprehensive operators manual
I'm going to pick it up next Sunday (Forest and Derby play the next Saturday, so I couldn't possibly miss that).
Subscribe to:
Posts (Atom)